Thursday, December 27, 2018

How to carding full tutorial

Carding full tutorial


Carding is a Method of Stealing the Information of Someone’s Credit Card and Using it to Buy Things from Online Stores, Using with the Access of that Credit Card. Thieves or Hackers, Who Steals these details Usually Calls Carders. They Buy Goods with these Credit Cards or Sell’s it Online. Below I have Included the Methods, That they Use in Carding. This is A Complete Guide to What is Carding? And How to Do Carding. This Guide Consists a Complete Carding Tutorial, So you can Learn All About Carding. I also Include List of Some Credit Card Dump Sites and Carding Forums so you can Clear your All Thoughts.
Carding is not Easy, As Simply Going to Site and Buy Some Stuff. If you want to Learn Carding, you have to Give it time and Practice and Have to use your Mind Yourself. I will just provide some Great Carding Techniques, A Complete Carding Tutorial, List of Some Dump Sites and Links of Carding ForumsBut you have to Learn it own. The Success Rate in Carding is very low Because Nowadays, Many Sites get you and Cancel your Order, So It needs very Patience and Time to learn it. This is a Guide for Especially a Noobie If he Wants to learn Carding. So Read Full Post, And If you will have any Doubt, Just Hit the comment Section, Below the Post. ????

Note:
 Carding is an Illegal Process, I don’t Recommend anyone to try this. This Carding Tutorial is only for Educational Purpose. If you try to do Carding, Then I will not Responsible for Any Damage.

What is Carding?
Carding is a Process, Where a User or Carder purchase Goods from a Hacked or Stolen Credit Card Details. Hackers Steal the Details of Credit Cards And then Buy Stuff from these details. Carding is an Art of Technique, If you want to learn Carding, You have to give it your time. If you are Noob, Then it is expected that you’ll fail some times, But the Key of Success is, Not to Stop and Keep Practicing.

The Success Rate for Carding is very Low, As their if the Site gets any Unknown Transaction from a Hacked or Stolen Credit Card info, They Usually Reversed the Transaction or Cancel the Order Placement.
However, Carding can Only be Done using US Cards, As these Cards does not require any Pin Verification or OTP’s. So If you are Using an Indian Credit Card, Then It is Highly Secured as they Won’t Work Without OTP Verification or 3D Secure Verification Unless International Transaction Mode is Enabled.
How to do Carding? Complete Carding Tutorial
Below I have Explained Everything in Deep, Plz Read and Share it with your Friends. ????

Basic Things You Need for Carding: Carding Tutorial
There may be So many Things, But I have Added the Most Important and Basic Ones in this List, Below I also Explained What these things are, And How it will help you in Learning and Understanding this Carding Tutorial. ????

  • A Computer
  • CC Cleaner or All in One Cleaner
  • MAC Address Changer
  • SOCKS
  • CC
  • RDP (Optional)
  • Drop( Optional)

Computer
Well, This is an Essential part, If you are going to do Carding. For Carding, I will Always prefer you to Use Computer because it has so many things and It is the Safest Way to Card. Many of Carders Use Mobile for Carding But It is not Safe, So I Prefer having a Computer First. But If you don’t have a Computer, then I have included the Safest way to Card with Smartphone. You can Check that Below. ????

CC Cleaner
It is a very Useful tool that mainly uses for Cleaning all the Browsing History, Clearing Cookies, Caches and Temp Files. This is a very handy tool, But not so many people know about it. Flash cookies are different from Regular Cookies, As they don’t Ask for permission to Install Cookies on your PC, and Saves All the info in your Browser, This Tool Even Clear all the Flash Cookies As Well. ????

MAC Address Changer
It is a Unique Identifier, That Assigned in an Network Interface Card. It is Unique of Every Computer. MAC Address Changer Allows you to spoof MAC Address of your Computer.

Socks
It is a Network Internet Protocol, Which Mainly Routes Network Packets between Server and Client using a Proxy Server. So, We’ll use it for Hiding Our Main Location and Proving a Fake Location to the location of Credit Card’s Holder for Making the Transaction Successful. Generally, It is more Secure than the VPN, as It won’t leak your DNS Details.

RDP
RDP Also knows as Remote Desktop Protocol, Which Allows you to graphically connect with a Computer Over a Network. It will connect you with any Computer Connected as an RDP on Any Country and Make yourself Anon. This is not Required but you can Use it for Safety Purposes.

Drop
Well, It is a Service, Which usage for getting Shipping Address for Carding. Suppose If you are from Pakistan And Carding with a US Credit Card. If you’ll add Delivery Address as Pakistan then There are so many chances to Cancel the Order, But If you will use a US Address, then there will be 95% Chances of Order Success. If you have any Relatives their than It is OK, But If you don’t have anyone than This service will help you. It will provide you an Address of that country, And Take Delivery and then Send that Parcel to you. it charges some money for it, But It will be worth in Investing in it. ????

Credit Card
This is the Essential Part of Carding, If you Understand what is it, Half of your Work will End Up Here. Whenever you’ll buy a Credit Card from any Online Shop, you will receive it in a Virtual Notepad File or Something with the Below format.

Types of Credit Cards
Below I Have Added some types of CC, You’ll Get while Buy it from Any Shop. ????

Regular Credit Card
  • NAME:
  • ADDRESS:
  • CITY:
  • STATE:
  • ZIP CODE:
  • TEL. BILLING NUMBER:
  • CARD NUMBER:
  • CARD EXP DATE:
  • CVV CODE:
Well, This is the Minimum Information you’ll get from a CC whenever you’ll Buy it. If you’ll not Get any of these Details, Then you can’t do anything with that CC. You are Out of Luck this Time. With this CC you can Card Simple Sites.
Partial Full-Info CC
In these Card, You will get some Additional Information with the Details Mention Above. This Information are
  • Social Security Number (SSN):
  • Date Of Birth (DOB):
  • ******’s Maiden Name (MMN):
with the Help of this Info, You can Even Card C2IT and Even Paypal. So this is Great if you’ll get these Details too. ????
Full-Info Credit Card
This Card Provides you full Details in it.

These Details are Below
  • BANK ACCOUNT NUMBER:
  • ROUTING NUMBER:
  • BANK NAME:
  • BANK NUMBER:
  • DRIVERS LICENSE NUMBER:
  • PIN NUMBER (For CC or ATM card)
If you’ll have this info, You can Card Anything. Yes, I said Anything.
Types of Credit Cards
Below are some of the Companies, Which Provides Credit Cards. I must Suggest you Use AMEX Premium, As It has mainly Usage by Many of the Carders. These Companies are
  • AMEX
  • VISA
  • DISCOVER
  • MasterCard

BIN- What is It?
BIN Stands for Bank Identification Number, It is the First 6 Digits of your Credit Card, Suppose if your Credit card number is 4305873969346315this, Then your BIN will be 430587. I will suggest you Collect some Information Related to BIN, This may help you in Learning Carding Easily. For BIN’s Bins.ProAnd BinListsare Best. This will help you in Learning Almost Everything about Bins. Must Do a check at these sites.
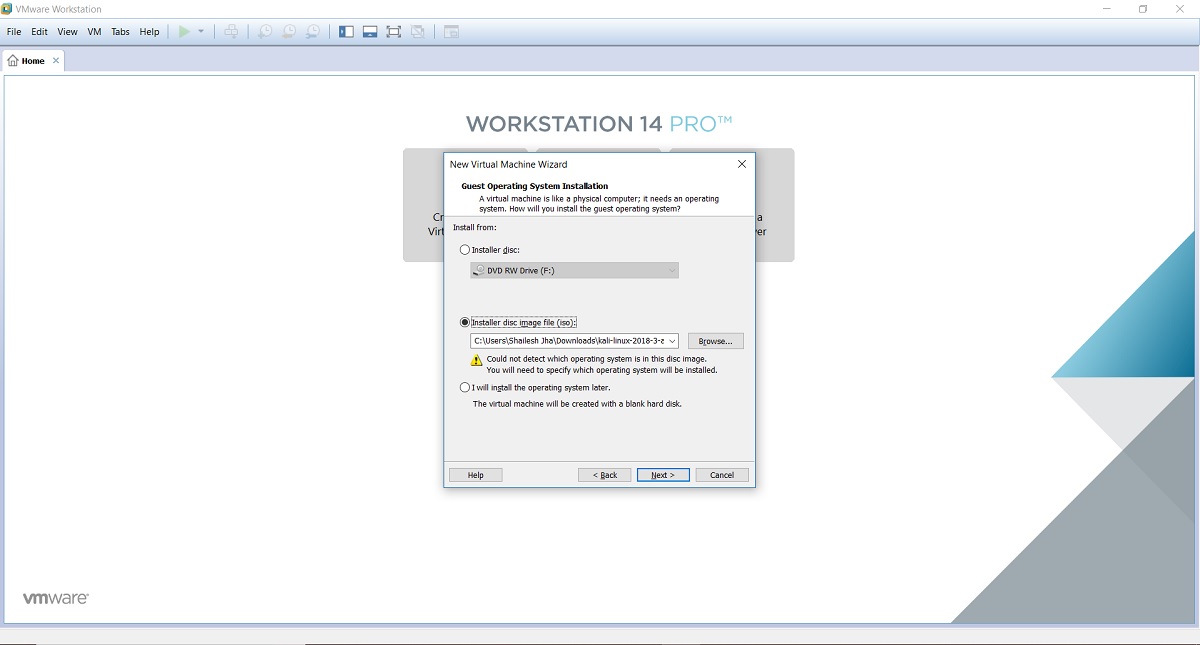
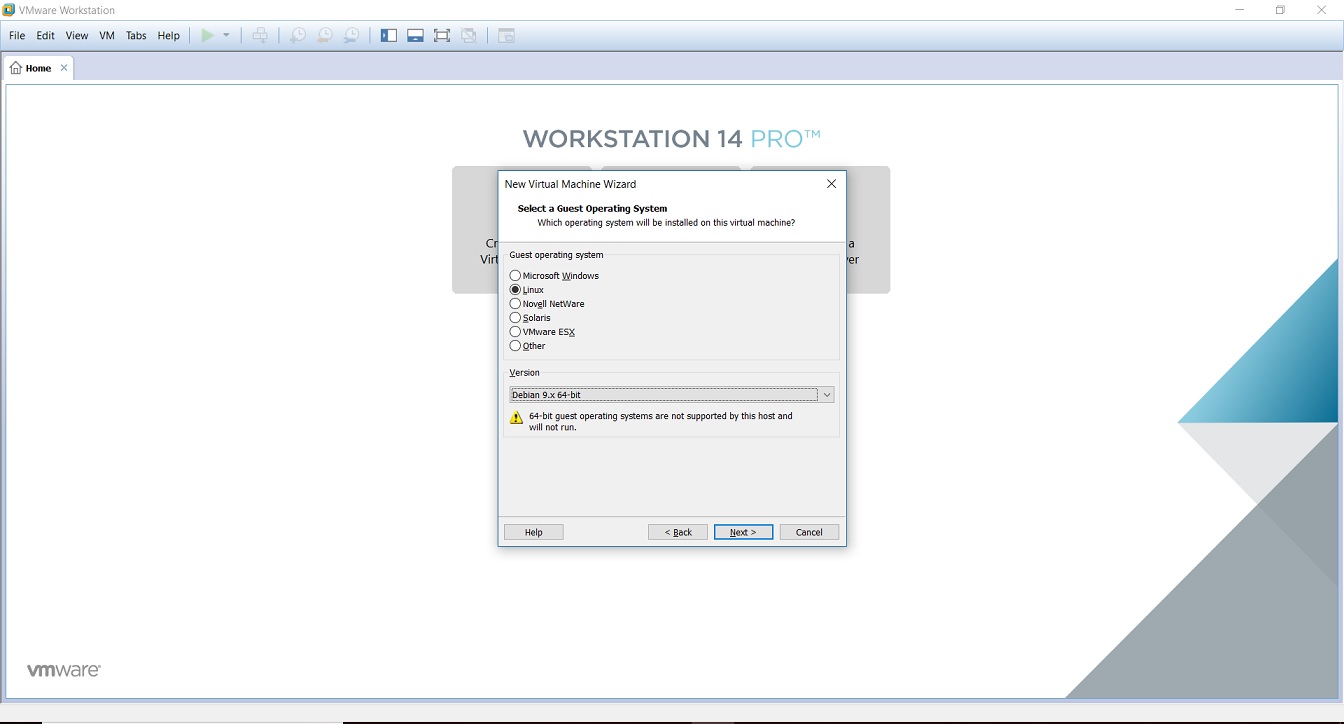
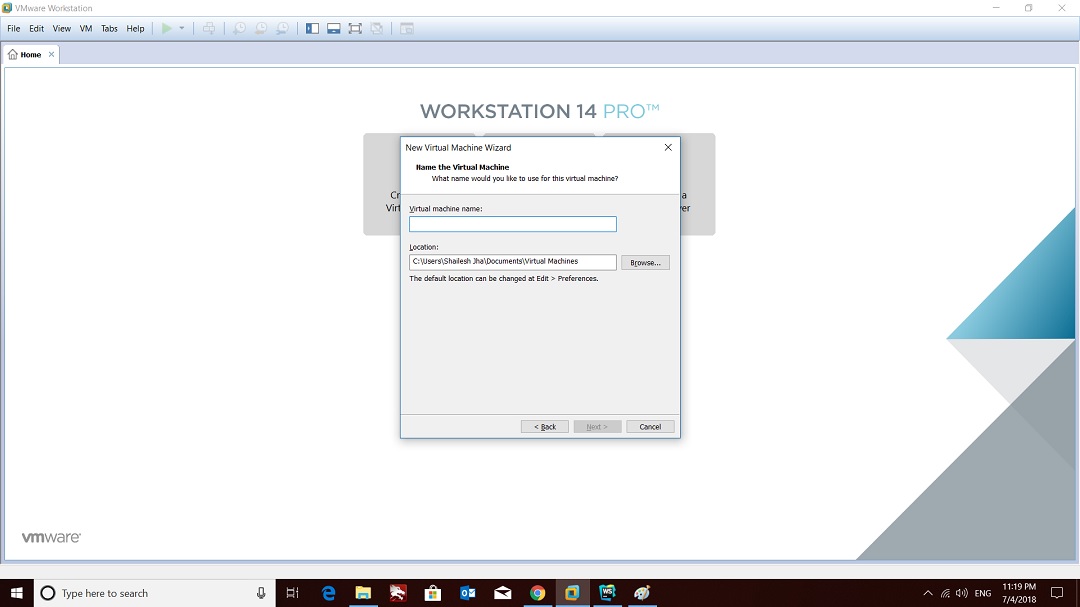
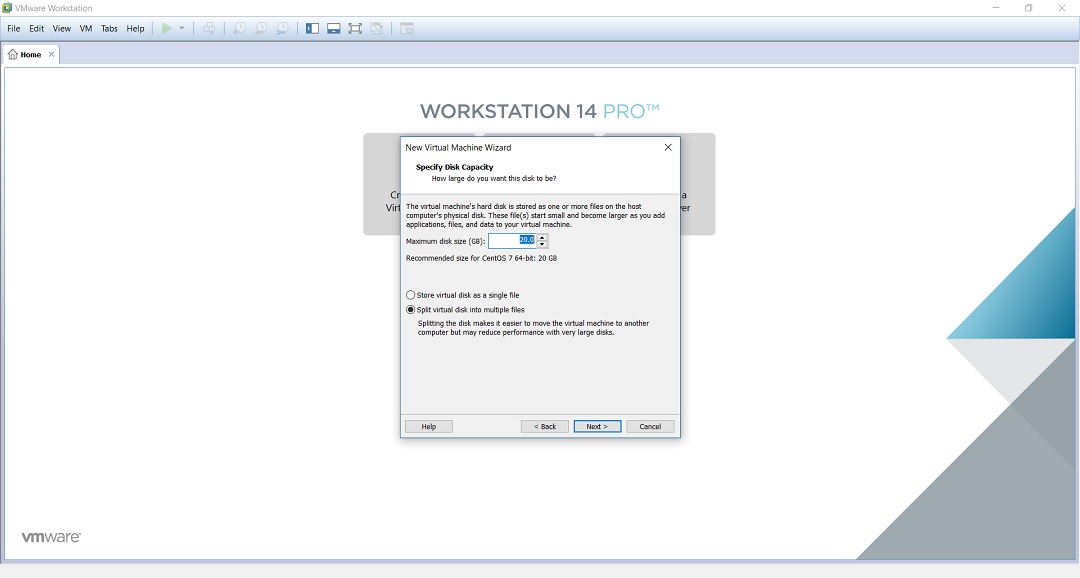
How to Card? Carding Tutorial
Well, Before Starting makes Sure you have gathered all the Required Things I Earlier Mentioned in the Post. For the Links of Download and Purchase See the End of Post. ????

Set Up Socks in Mozilla
Just Open Firefox, Than Go to Options and Click on Advanced Settings. After that go to Network and then A Pop-Up will appear. Select the fourth option of Manual Proxy Configuration.Now type the Proxy and Port Below, That’s it.

After Adding the Proxy there, Just Hit OK and Restart the Firefox and Now you’ll be Connected with Secure Socks.

Note:
Make Sure to Buy Socks with the Matching Location of the Address in Credit Card. Suppose If Credit Card holder is From South Africa, Your Socks are also of South Africa.
How to Carding? Step By Step Tutorial of Carding

1. Create a New Email Account with the Matching Name of CC Holder, If CC Holder Name is Smith Parker then Make Something Like Smithparker78@***.com
Note: NeverUse Disposable Emails for Carding.
2. Run RDP and Connect with your Host, In case if you are not Using RDP Follow the Steps Below-
3. Change All the MAC Addresses Using MAC Address Changer.
4. Clear All the History of Your PC Including Cache, Temp Files using CC Cleaner.
5. Set Up Sock5 in Mozilla Firefox, Check Above I Have Explained How to Setup Socks in Mozilla.
6. Now, Restart your Browser and Visit This link to Check is your IP Changed with the Location of CC holder or Not.
7. Open Any Local Online Market Store, I will suggest you Use anyone which is from your own country.
8. Register Account with the Name of CC Holder and Email you made for Carding.
9. Try to Add an Item to your Cart, The item should Below USD $500, Never use Big Orders for the First Transaction.
10. In Shipping Address, Add the Address where you want to Deliver the Product.
11. Now, Go for the Payment Option, Choose Credit Card for Payment. ????
12. Enter All the Credit Card Details you Received when you bought the Credit Card.
13. For Billing Address, Use the Address of CC Holder.
If you follow all the Steps Above, your Order will be Successfully Placed. Now wait for Order to Arrive, When the Order will arrive, the Courier boy will make a Call to you, And When you’ll go for taking the Product, he will ask you for Any ID Proof, Try to Provide them any Fake ID, or If you’ll not able to make Fake ID, Comment, we’ll make one for You. ????
Note:Never try to Give real ID Proof while getting the Delivery.
How to Card with Android Smartphone
Well, I won’t suggest to do it with Mobile or Android Smartphone, Either You can Try. I personally Suggest using a PC for it. ????
1. A Rooted Android Device with Some Apps Installed, Apps Like- IMEI Changer, CCleaner, Android ID Changer, Proxy Droid, and Phone ID Changer.
2. Change IMEI, Android ID and Phone ID Using Apps.
3. Connect SOCKS Proxy Using Proxy Droid App.
4. Now Follow All the Steps of Carding Mentioned Above. ????
List Of Sites for Carding?
Well, There is no one Site which can’t be Carded, Its All Depends on the Credit Card you have. It all depends on your methods and Active mind.
How to Check Balance on Credit Card?
Follow the Steps Mention Below, the Steps will only work with US and UK Based CC’s.
  • Check your BIN in www.binspro.com and get your bank name. For example of the BIN (430587), the bank is Capital One, USA.
  • Now search phone number bank in google. For this bank, it’s +1-800-935-9935
  • Call the number on Skype, it’s free since it’s toll-free number.
  • Now the automatic robot will ask you some info. Ex. CCN, CVV etc.
  • Now put your info by using your keyboard.
  • It will automatically tell you the CC balance.

Useful Links

Buy CC- www.validcc.su
Buy Socks- www.vip72.com
Download MAC Address Changer- Link
Download CCleaner- Link
Download Socks Checker- Link
Last Words-

So, The Post, End’s Here. Carding is an Illegal Activity, so I won’t suggest Anyone try this. It can ruin all your life, The Motto of this Article is Just to Spread Knowledge. If you have Any Confusion, Must Comment Below. ???

Saturday, December 8, 2018

How To Install Virtual Machine in VM Workstation For PenTeating And Hacking

How To Install Virtual Machine in VM Workstation For PenTeating And Hacking


Step 1 – Download Kali Linux ISO image

To install the Kali Linux, we will have to first get the installer ISO image file. You can get it by visiting the official download page. Please download the 64 bit or 32 bit image depending on the system you have. Dont get confused by the many options available such as Kali Linux 64 bit Mate or Kali Linux 64 bit Xfce. They are all the same except for the desktop environment. LXDE, Mate, Xfce are various open source desktop environments. I use Kali Linux 64 bit, but the choice is yours. It does not really matter.
Just remember that Kali Linux 64 bit Light is the minimal distribution which will not contain all the features. You will have to install the tools you want later on. There is also an option to download the VMware image directly. But I prefer to create my own Virtual Machine which has all the tools installed, which this blog is all about. Since the file size is large, around 3 GB, I prefer to download via torrent because it is fast and flexible
Kali Linux Official Download Page

Step 2 – Locate the downloaded file

You can find the downloaded image file in the downloads folder, if you have not changed the default settings. The filename would be something like kali-linux-2018.3-amd64.iso. If you have downloaded through torrent, the ISO file will be downloaded in a folder, folder name would be something like kali-linux-2018.3-amd64.iso.

Step 3- Open VMWare Workstation

Open VMware Workstation from Windows Start menu or from you desktop if you have VMware Workstation icon there.
VMware Workstation home screen Screenshot

Step 4 – Launch VMware Workstation New Virtual Machine installation wizard.

To launch the wizard to create a new virtual machine, Click on Create a New Virtual Machine or File -> New Virtual Machine. Welcome to the new Virtual Machine Wizard dialog box will open. Select typical and click on next.
VMware workstation home create a new virtual machine screenshot

Step 5- Welcome to the new Virtual Machine Wizard dialog box appears

This is where you get a chance to select the way virtual machine will be created. Typical is predefined or mostly the defaults. Custom is where you get to set advanced options such as compatibility with older Virtual Machines, SCSI controller type, etc. We will go with the default options. Select Typical and click Next.
VMware workstation home - create a new virtual machine wizard - welcome screen screenshot
VMware workstation home – create a new virtual machine wizard – welcome screen screenshot

Step 6- Select installation media or source

In this dialog box you will have to browse to the downloaded ISO file and click next. Generally, VMware Workstation detects the OS automatically and initiates what they call as the Easy Install. But in the case of Kali Linux this is not the case and you will see a warning(yellow triangle). Please ignore that and click next to continue.
Kali Linux Installation - New Virtual machine Wizard - Browse Guest Operating System
Kali Linux Installation – New Virtual machine Wizard – Browse Guest Operating System

Step 7- Select Guest Operating System

In this dialog box, you will be asked to select the Guest Operating System. Select Guest operating system as Linux and Version as Debian 9.x 64-bit or 32 bit depending on your system.
Kali Linux Installation - New Virtual machine Wizard - Browse Guest Operating System
Kali Linux Installation – New Virtual machine Wizard – Browse Guest Operating System

Step 8- Provide Virtual machine name

In this dialog box, you will be asked to provide the name of the virtual machine. You can provide any name you like. You can also change the location of the virtual machine. By default it is place in the Documents/Virtual Machine folder. Leaving it as the default is also fine.
VMware workstation home - create a new virtual machine wizard - virtual machine name screenshot
VMware workstation home – create a new virtual machine wizard – virtual machine name screenshot

Step 9- Specify disk capacity

This dialog box asks you to specify the disk capacity. This is the maximum amount of disk space it will utilize once the Virtual Machine is created. You can leave it to the default but if you are running low on disk space, you can reduce it to 20 GB. This is generally sufficient if you are not planning to install heavy disk using software’s such as Photoshop. Such software’s reduce the performance of your Virtual Machine if your Computer is not powerful enough.
Check Split Virtual Disk into multiple files. This is the default option. Say if you specify 60 GB, all of 60 GB will not be utilized or say 60 GB will not be blocked at once. These Virtual Disks expand according to the usage with a Maximum size you specifed as the disk capacity. On a fresh install normally it takes 10 GB of space which will grow according to the software’s you install in the VM.
VMware workstation home - create a new virtual machine wizard - specify disk space screenshot
VMware workstation home – create a new virtual machine wizard – specify disk space screenshot

Step 10- Ready to create Virtual Machine Dialog Box

This is the final dialog box and what you see is all the options you have selected in previous dialog boxes.
Kali Linux Installation - New Virtual machine Wizard - Ready to create Virtual machine
Kali Linux Installation – New Virtual machine Wizard – Ready to create Virtual machine
Normally I increase the RAM and memory before clicking finish. This helps to finish the installation process faster. If you have sufficient RAM and CPU on your host Windows machine, I suggest even you should increase RAM and CPU. To increase the RAM, before clicking Finish, click on customize hardware. Increase the memory using the slider.
VMware workstation home - create a new virtual machine wizard - hardware memory setup screenshot
VMware workstation home – create a new virtual machine wizard – hardware memory setup screenshot
To increase the CPU, Enter the values number of processors and number of cores. Click on Finish to start the installation process.
VMware workstation home - create a new virtual machine wizard - hardware processor setup screenshot
VMware workstation home – create a new virtual machine wizard – hardware processor setup screenshot
Click on Close and Finish to start the installation process

Step 11 – Power on Virtual Machine

Now you will have to power on the virtual machine to start the process. You can see the option to power on the VM on top left hand side.
VMware Workstation- Power on Virtual machine

Step 12 – Select Graphical Install from Boot Menu

Here you will see many options. Select Graphical Install using the down arrow key and click continue.
Kali linux installation boot menu screenshot

Step 13 – Select a Language

In this dialog box you will be asked to select a language. Please select a language and continue. This option sets your language in the Kali Linux Operating system. Default is English.
Install Kali Linux 2018 in VMware Workstation 14- Select a Language Screenshot

Step 14 – Select Location

In this dialog box you will be asked to select a Location. Please select a location and continue. This option sets your Location in the Kali Linux Operating system. later on, you will be able to set the time zone based on the location you choose here.
Install Kali Linux 2018 in VMware Workstation 14- Select Location Screenshot
Install Kali Linux 2018 in VMware Workstation 14 – Select Location Screenshot

Step 15 – Configure the Keyboard

In this dialog box you will be asked to select the keyboard layout. Please select a Keyboard layout using the arrow keys and click continue. This option sets your Keyboard in the Kali Linux Operating system. By default it is set to American English.
Install Kali Linux 2018 in VMware Workstation 14- Configure keyboard Screenshot
After you click continue, you will see the installation progresses for some them you see the Network Configuration dialog box, which is the next step.
Install Kali Linux 2018 in VMware Workstation 14- Installation progress Screenshot

Step 16 – Configure the Network – Enter Hostname

In this dialog box you will be asked to enter the hostname for your system. This being a home network, we can set anything. Enter any anything and click continue.
Install Kali Linux 2018 in VMware Workstation 14- Configure the Network Screenshot

Step 17 – Configure the Network – Enter domain name

In this dialog box you will be asked to enter the domain name for your system. This being a home network, we can set anything like example.com
Install Kali Linux 2018 in VMware Workstation 14- Configure the Network- Enter Domain Name Screenshot

Step 18 – Set password for User root

In this dialog box you will be asked to enter the password for the root user account. Please enter a password of your choice and click continue. This is the password for user root with which you will login when the installation completes.
Install Kali Linux 2018 in VMware Workstation 14- Set up Users and Password Screenshot

Step 19 – Configure Clock

In this dialog box you will be asked to time zone based on the location you selected earlier. Please enter a time zone of your choice and click continue.
Install Kali Linux 2018 in VMware Workstation 14- Configure Clock Screenshot

Step 20 – Partition Disk

In this dialog box you are asked how you would like to partition your disk. Select Guided – Use entire disk and click continue. This is the default option.
Install Kali Linux 2018 in VMware Workstation 14- Partition Disk Screenshot
In this dialog box you are asked to select a disk to partition. Select sda, VMware Virtual disk. There should be only one option. Click Continue.
Install Kali Linux 2018 in VMware Workstation 14- Select Disk to Partition Screenshot

Step 21 – Select partition scheme

In this dialog box you are asked to select a scheme for disk partition. Select the default, All files in one partition and click Continue.
Install Kali Linux 2018 in VMware Workstation 14- Disk Partitioning Scheme Screenshot

Step 22 Disk partition Overview

In this dialog box you are see the summary of your disk partition. Select the Finish Partitioning and Write changes to disk which should be selected by default. All you have to do is to click continue.
Install Kali Linux 2018 in VMware Workstation 14- Disk Partition Overview Screenshot

Step 23 – Disk partition Confirmation

In this dialog you are asked to confirm Write changes to disk. Select yes and click continue.
Install Kali Linux 2018 in VMware Workstation 14- Disk Partition Confirmation Screenshot

Step 24 – Installation starts

Now the actual installation starts. Wait for Configure the Package Manager Dialog box to appear.
Kali Linux - Installation begins
Kali Linux – Installation begins

Step 25 – Configure the package manager

In this dialog box you will ask if you wish to configure network mirror for Package manager. Choose yes and continue. You can skip this by selecting NO. But the default option Yes is better. I will go with Yes.
Install Kali Linux 2018 in VMware Workstation 14- Configure the Package Manager Screenshot

Step 26 – Configure the package manager – HTTP Proxy

In this dialog box you will ask if you wish to HTTP proxy. Leave it blank and click continue.
Install Kali Linux 2018 in VMware Workstation 14- Configure the Package Manager - HTTP proxy Screenshot
Install Kali Linux 2018 in VMware Workstation 14- Configure the Package Manager – HTTP proxy Screenshot
Installation process will continue. Wait for sometime and let the process continue.
Kali Linux Installation

Step 27 – Install GRUB boot loader

In this dialog box you will be asked if you would like to install the GRUB boot loader. Select Yes and click Continue.
Install Kali Linux 2018 in VMware Workstation 14- Install GRUB Boot Loader Screenshot

Step 28 – Select device for GRUB boot loader Installation

In this dialog box you will be asked to select boot loader device for GRUB installation. Select /dev/sda and click Continue.
Install Kali Linux 2018 in VMware Workstation 14- Select GRUB Boot Loader Device Screenshot
Installation will continue. Wait for the process to complete.
Kali Linux Installation

Step 29 – Installation Complete

Installation will continue and now you will see Installation complete dialog box. Click continue to finalize the installation and wait for the VM to reboot. After reboot you will see the login screen. Login with your username or root user and provide your password. You will then see the Kali Linux desktop.
Install Kali Linux 2018 in VMware Workstation 14- Installation Complete Screenshot
Process will begin again. Its just finishing up the installation process and then the VM will reboot.
Kali Linux Installation
Once the VM reboots, you will see the Kali Linux login screen.
Login with username: root, Password: what you entered during the installation process earlier.
Kali Linux login screen dialog box screenshot

Step 30 – Switching to Full screen mode

After login, if you want to switch to full screen mode, you wont be able to. What you will see is the resolution of 800×600 which is the default resolution. This is because, VMware tools are not installed. Please follow the below steps to install VMware tools. After the installation and reboot, you will be able to see the desktop with resolution same as your computer.
Kali Linux desktop VMware no full screen - Resolution 800x600
Kali Linux desktop VMware no full screen – Resolution 800×600

Step 31 – Install VMware Tools

To install the VMware tools, follow the below steps.
If you don’t have internet connection, you can install VMware tools directly from the VM. If you have internet connection, follow the next instruction which is easier.
  1. Goto VM-> Install VMware Tools
  2. You will see VMware tools Icon on the desktop. If you don’t, then click on Places in the menu, Places->VMwre Tools. Double click to open.
  3. Copy the file with the file name something like this VMware-tools….tar.gz to the desktop.
  4. Right click on this file on the desktop and click Extract here. You will see that the file is extracted to the folder vmware-tools-distrib.
  5. Open terminal by going to System Tools -> terminal
  6. Goto the folder vmware-tools-distrib on desktop by entering the command cd /Desktop/vmware-tools-distrib
  7. Now run this command:
    sudo ./vmware-install.pl -d
  8. Enter your password and press Enter. You will be asked if you want to proceed with the legacy installer. Enter Y and press Enter.
  9. Now you will be asked series of questions, just accept the default by pressing Enter for all and wait for the installation to complete.
  10. Wait for the installation to complete. You will see more prompts, except the defaults by clicking enter. Once completed, restart your VM by going to VM->Power->Restart Guest
  11. Once the system restarts, you will be prompted to login. Once you login, you can see the desktop in full screen mode which stretches up to the complete screen.
If you have internet connection, try this
  1. Open Terminal
  2. Execute the command
    sudo apt-get install open-vm-tools-desktop fuse
  3. Enter your password
  4. Enter your password, if asked
  5. Enter Y to accept whenever asked
  6. Wait for the process to complete and restart. You are done. Login and now you will see the desktop in full screen mode
You can check the version of installed VMware Tools. In terminal, execute the command
vmware-toolbox-cmd -v
. This will show you the version number.

Process Complete

You are done, You can start working on Kali Linux 2018. Thanks for Visiting my blog.
Kali Linux desktop screenshot